
There are no rules. That is how art is born, how breakthroughs happen. Go against the rules or ignore the rules. That is what invention is about.

Hey everybody! Yes, I know the newsletter is a few days late. I spent Sunday taking a walk alongside the Calaveras River taking photographs of wildflowers and bees. When I got back home, I spent the rest of the day hanging out with my mom watching her knit and sketched some of the photographs I took.

Just look at those bees doing their thing, how could I not stop and just watch? Also felt like a wildlife photographer doing this !
In all honesty, I totally forgot about the newsletter. I was so wrapped up with the flowers and the bees…truly living in the moment! I am sure you will see some of those sketches come to life very soon.
A warm welcome to the 5 new subscribers who joined The Inkplate community this past week.
In today’s issue:
🙋🏽♀️ Question Time!
Let’s dive in!

Spring Online Sale
I am so excited to announce that my Spring sale through the website is still going on!
Use code: GGRPWMS for 15% off store wide at check-out.
Much appreciated for your support.
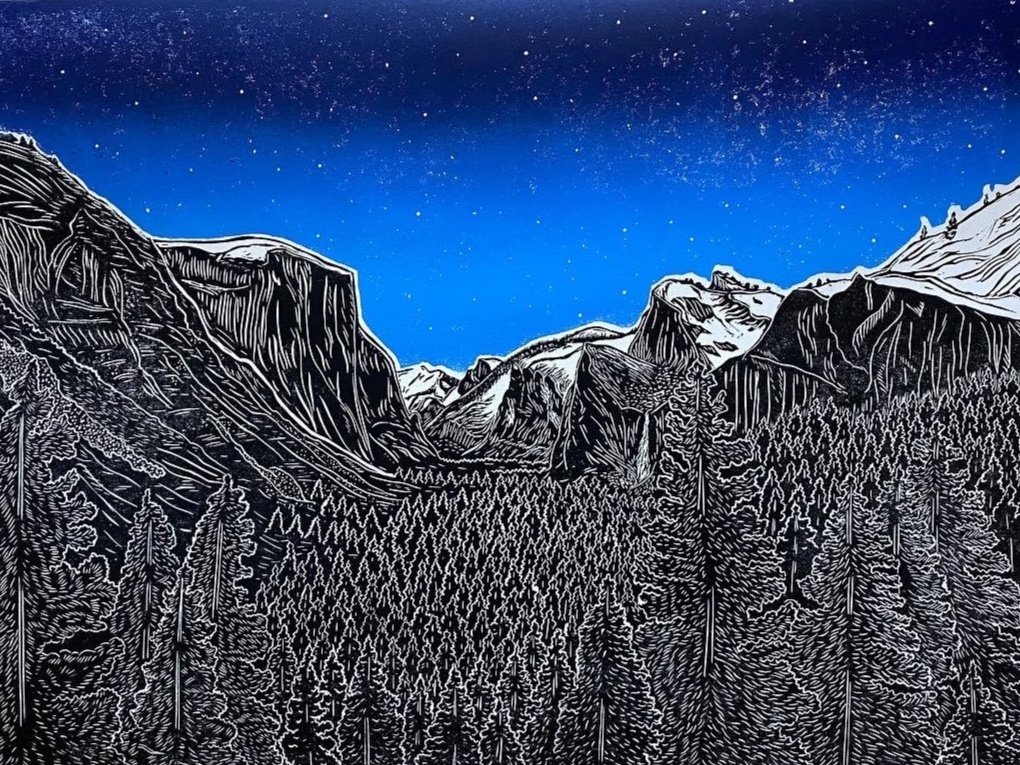
Week 3 of Reduction Linocut - Transparent Base

For week three of our class, we set to work right away with layer two of our print!
First, I started by carving the top portion of the block since I had already printed the sky layer. With a V Gouge, I chose to focus on the horizon line where the mountains met the sky. I made one long cut across the entire horizon, which serves as my protection line.

Second layer applied
Next, with a larger U Gouge, I began cutting away the rest of the sky. While removing the material, I switched over to an even larger Scoop U Gouge from my Power Grip set. This gouge is great for removing large chunks of material with a few strokes.
One of the things I sometimes do when I am feeling lazy and don’t remove a lot of material is to just cut enough linoleum up to the point that I will no longer recover it with ink.
Well this trick works…as long as you don't apply too much pressure on the area where you still left the uncut linoleum. If you do press too hard on that area, like I did during the live show, you will have a sharp burnish line on your print. You do not want that. Do not be lazy like me and make sure to remove all the undated material away!

Registration set-up
The next layer of color I applied was a mixture of titanium white, ultramarine blue, black and a lot of transparent base. I added a more transparent base than I did white and the reason for that is because I wanted to make sure that some of the original violet hues come through the white layer.
As I progress through the layers on this print I will make sure to add a little bit more transparent base with the ultimate goal of making sure that all colors play with each consecutive layer.
Today, I will be working on carving out layer three and hopefully get the block ready for printing for tomorrow. If all goes according to plan, I hope to carve out the fourth layer on Friday so that I can be ready for the last class on Saturday! Hope this makes sense! HA.

Some of the marker from the linoleum transferred over for the first few sheets of paper, not a big deal since they will be covered up.
Once this next class is over, I will be releasing a survey. I’d love to know your thoughts about this whole experience! I owe all the thanks to Speedball and their unwavering support in the last 8 classes.
Ask Daniel
Do you have a printmaking or artist-related question you want me to answer? Reply to this email and let me know here!
I would love to see how you cut your lino for puzzle pieces. Am not sure I am asking this correctly but when you cut a carved lino into pieces to ink individually, then put back together to print. I see the finished prints a lot but no one shows how to neatly cut them out. Thanks
Well to start off, you need a really sharp knife. I am not referring to kitchen knives…please don't go grab that! One time someone let me know that their bread knife was not working. I don't blame them, I blame myself for not being thorough!

Knife is on the middle
Using a printmaking knife, start cutting very slowly around the shape you would like cut off. There is no special technique for this other than a really sharp knife, a steady hand and a bit of patience.
Naturally, synthetic blocks like the Easy Carve, Speedy Carve and Easy Cut will be easier to slice off. You can see some videos here on how easy they are to cut.
Linoleum on the other hand requires a bit more elbow grease to get cut right. One of the things that I have noticed when cutting linoleum is that it is easier to do so when warm. I typically put it in front of the heater for 1-2 minutes before puzzle cutting. Alternatively, you could also use a hairdryer.
Leave me a comment!
Would you like to leave a comment on how I can improve this newsletter?
At the bottom of each article you will be able to leave a comment of up to 1000 characters long. This feature is only available on the web version of the newsletter. You can view the version either by clicking the “Inkplate” button on my website or by clicking on the “Read Online” button on the email version.

Comment section is available on the online version of The Inkplate
